Tuesday, 25 May 2010
Transforming the space
We've really transformed the space into the final installation aesthetic with our props, research and other items. A low light level will help what is turning into a great atmospheric space. It had taken ages to get the research on the walls and the wiring done but we are just about ready to go!
The research
We have collected and ripped apart so many books in the research that are going on the walls and will be annoted by the character, this was massively time consuming but should look great on the walls. It all relates to the machines in abstract and wierd ways and should convey the obsessive mind of the character. All kinds of text and image he has used in some way to piece together and interpret the blueprints.
Saturday, 22 May 2010
Making the circuits and programming the code
I made all the circuits for the electronic side, the LDR sensors, relays and Hbridge circuit as well as a paralell lighting circuit for inside of the praxinoscope. They are all relatively simple and the code has been adapted specifically for each machine ready for installation. The code below has yet to be set up with the correct threshold of light and timings as this will be done shortly before finishing the whole thing.
We are also thinking of adding in some servo circuits at the last minute to turn the projectors on and off perhaps also using an LDR!
NOTE: I'LL EMAIL THE CODE AS IT WON'T LET ME PUT IT ON HERE (HTML PROBLEM)

We are also thinking of adding in some servo circuits at the last minute to turn the projectors on and off perhaps also using an LDR!
NOTE: I'LL EMAIL THE CODE AS IT WON'T LET ME PUT IT ON HERE (HTML PROBLEM)

Thursday, 20 May 2010
Mike Nelson - The Coral Reef
Got an email from Matts Gallery today informing me the coral reef was now on display in tate britain! Great news as it is one of the main contextual works for our own project... unfortunately it has been delayed due to health and safety concerns. Will have to go after the deadline now, really does go to show how difficult it is to get an installation into a 'safe form' fit for public exhibition though.
Building the praxinoscope machine
We've been working on the praxinoscope machine for a while now, we saw some good examples in the V&A museum of childhood that helped us out a bit. I decided to use part of an upturned childs bike for the turning mechanism with the motor attachment directly mounted onto it, I then mounted a circular pan onto the rim of the wheels and Faysal made the 12 faced middle segment to stick on the mirror. The mechanism works great and hasn't jammed the whole time its been running which was my main concern.
The mirror itself proved a bastard to cut but i got it done in the end, some of the pieces were a bit rough around the edges which fits the DIY aesthetic we're going for anyway.
I measured up the legs and cut them to size before drilling and bolting them onto the boiler... it seems to stand up okay but we are taking real care when moving it around as copper is not a particlarly rigid metal. Once the two different segments were complete (the tank lifts onto the praxinoscope) we had to work out how the viewer was going to view the animation as it is in the bottom of the boiler and the viewer looks in near the top. We picked up an old childs periscope or... hall of mirrors according the blueprints... at the bootfair and have mounted that inside. We did explore other options but this was the most effective. We delensed some binoculars and fitted them into the tank looking into the periscope that then looks onto the mirrored praxinoscope and YES! We have been working on this machine a long time and it was the most fiddly and tricky thing to get right in the installation, now it is near completion it is really looking fantastic, i'm going to make a lighting circuit we can put inside to control first the light coming on and then the motor turning so that when the praxinoscope machine is not on you cannot see the animation cell prematurely!


Wednesday, 19 May 2010
Building the transmission machine
The transmission machine design didn't come to us for ages but once it did it was decided we would build a kind of ariel, transmitter / pylon. It required quite a bit of welding so we designed it up with sizes and ordered the steel rods. After they had arrived I marked out all the steel and cut them to size by hand ready to weld. As dave in the metal workshops can only have one person welding at a time, we welded it and I held + decided on the position of the rods. After the initial frame went up the top was too wide so I took the decision to shorten it to bring it to more of a point which now looks much better.
After it was completed we transported it by van back to the space we attached the ariels and other props that make up the machine, Faysal and Andy attached the arms that link the two other machines to this central machine (figure.3) and dressed it with wires etc. It is looking pretty imposing and is a great size for the little room. Good stuff.


After it was completed we transported it by van back to the space we attached the ariels and other props that make up the machine, Faysal and Andy attached the arms that link the two other machines to this central machine (figure.3) and dressed it with wires etc. It is looking pretty imposing and is a great size for the little room. Good stuff.


Tuesday, 18 May 2010
Building the boot machine
We sketched out the cam design and I got dave to weld a motor attachment for the cam shaft. We then set about testing different size and shaped cams on the rod to try and get the hitters moving as we want without stressing the motor too much. After finally finding the right ones, we cut them out and attached them. We first used temporary hitters before making the real hitters with items collected over the project, one of which is really heavy but the motor seems to be able to cope.
We built the frame and tested it all out without water. It was working but working a bit fast so we've changed the voltage going into it to slow down the hitters, ideally it would be turning as slow as possible but if they get stuck in the installation and the bolts come off then we are in trouble so we haven't gone too low, it is a fine balance.
For the microphone spool we found an old 16mm film spool, attached the motor (which needs the H-bridge circuit) and drilled holes for the microphone coil before mounting it on the ceiling, This works really nicely and drops the microphone down into the water at a really nice speed just how I always imagined it to look.
We've filled the tank with water and it is looking really murky and reflective, we might add some black colouring to make it even darker but this is undecided as of yet! The main thing is it all seems to be working, we're just waiting on some motors to be delivered before it is all ready.


Monday, 17 May 2010
The praxinoscope animation
We all decided on a boat at sea for the animation within the praxinoscope and andy + faysal did some sketches which looked pretty good, I really wanted to make it a 3D animation using several layers to really make the scene come alive. This was deemed too time consuming and tricky, however on reflection the handrawn, simple, childlike aesthetic of the animation goes well with the, escape fantasy of the character and it looks great now it is coloured!
Table jackpot!
So I was rummaging in a skip looking at this old fire door to make a table out of... got chatting to a guy who it turns out was clearing out the old print makers nextdoor and let us have ANYTHING we wanted. It had some great benches and little tables and other materials that were perfect and all for free. LEGEND.
Bit of a logistical nightmare carrying it back but we got it home in the end, great find!

Bit of a logistical nightmare carrying it back but we got it home in the end, great find!

Saturday, 15 May 2010
Building the dark room
To build the characters dark room (and make something of the dodgy kitchen units in the corner of the room) I built a frame from some 4x4 cm and screwed it upright. We then used found boards, cut to size to complete the walls. A cardboard ceiling was put in later and was dressed with the black and white photo's from the cult shoot and the darkroom stuff we obtained from the bootfair! It should look great within the context of the rest of the installation.


Wednesday, 5 May 2010
Blueprints made!!
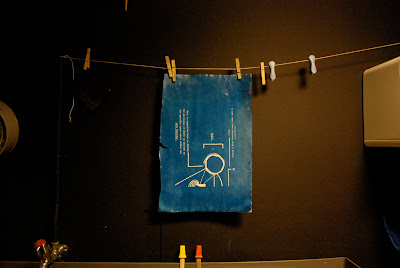
We spent much of the morning today making the blueprints having finalised the designed and printed them onto two sheets of a3 acetate per blueprint (triple layered). Me and Faysal coated the paper with the UV reactive chemicals yesterday, allowing 24 hours to dry so that they were ready for printing this morning. We took the paper in a lightsafe box over to the textiles department and used their UV light press machine which was great, we stuck the tripled up acetate to the glass face down, then when we were happy it was all matched up we put a layer of the coated paper on top and closed the lid. We used the built in vacuum press which compacts the layers down dead flat onto the glass and exposed it for 3 minutes 10 seconds to the UV. The paper is then transported back in a lightsafe box for 10 minutes of washing under cold water before being hung to dry (see images for the illustrated process).
We first did a test to make sure it was all working okay which came out perfectly before proceeding to print all three full size blueprints. They have come out so well, so much better than I thought they would and i'm pretty chuffed we've managed to set about and complete this process to give us some authentic, original documents that play an integral role in the narrative of the installation. Since I first researched and proposed this idea I've been hoping we could follow it through to completion and it has proved extremely satisfying; I think its fair to say we're all really pleased with the results.
We spent the rest of the afternoon building the praxinoscope.


Sunday, 2 May 2010
Weekly schedule 03 / 05 / 10
Monday (Andy at work):
Tuesday (Andy at work):
- Make final adjustments to blueprints and divide up ready for copying to acetate on tuesday morning
- Gather wood at the space
- Explore praxinoscope in more detail, carry out some testing
- Get table for transition machine
- Finalise design + specific measurements for transition machine tower
Tuesday (Andy at work):
- Buy more paper in atlantis first thing
- Copy blueprints onto acetate
- Give Dave final design and measurements for transition machine tower
- Cut rod 10cm longer than cam-shaft for pivot on boot machine
- Do cyanotype printing of blueprints
- Move stuff out of J.1.17 to hackney with Bedford in evening
Wednesday:
- Praxinoscope + Bootmachine construction (mounts and mechanisms)
- Start working together the research
- Send Chris directions to space, confirm time and email andy about long-play tapes!
Thursday:
- Praxinoscope + Bootmachine construction (have working by end of day)
- Build darkroom into the space
- Carry on working with the research
Friday:
- Chris visits the space
- Have both machines working
- Start working on circuits and code
- Build microphone spool
- Plan sound recordings and VHS
We need tables!
One of our last main concerns re: materials, is the severe shortage in tables we have managed to get hold of. There are obvious practical problems of local pick up anywhere outside of London which is where most seem to be, they have to look right too, fit the setting.
We've been scouring ebay etc for quite some time and have yet to make a purchase, annoyingly at the bootfairs all the regular sellers have great tables that would be perfect... but they use them to sell all their stuff and are too expensive to replace with modern ones so they never sell.
We have considered making our own tables but this would be time consuming and may look a bit over the top (aswell as being a bit dodgy). A sensible compromise seems to be the use of builders trestles and making our own table top, we need atleast 2 long tables and a smaller table within the installation.
If we concentrate on getting some trestles cheap, we can get free wood or cheap recycled scaffolding boards to make the table tops fairly easily. I've found some sources we could use for this: www.lwrp.org.uk / www.communitywoodrecycling.org.uk / some guy in E2 selling 3m planks £5 each.
Something like this:
Saturday, 1 May 2010
Blueprint designs
We have drawn up blueprint designs for the three machines at last, ready to copy onto acetate and cyanotype print; me and beve selected some really perfect paper (A3) with rough edges and a handmade feel for the job. I'm really hoping this works as it will be great to produce authentic documents for the installation, I found this magazine on flickr that was cyanotype printed in full which gives me more confidence in what we are trying to achieve:

Faysal and Andy mainly worked on them, adding my input in a more editorial role. It took a while but bar a few last minute tweaks they are pretty much there. I like the interplay between the hand drawn aesthetic and the official validity of the format through which they will be produced, a document which was designed to be mass reproduced.
Boot Machine:

Praxinoscope Machine:

Transition Machine:
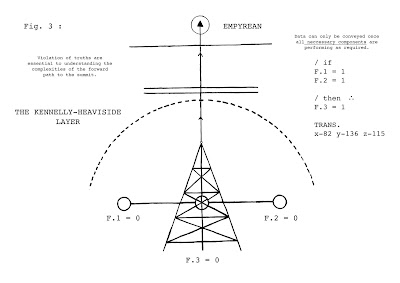
Subscribe to:
Comments (Atom)